Showing posts with label clothing. Show all posts

Tuesday, September 21, 2010

How to Rip Jeans

How to Rip Jeans


Ripped jeans have always been a favorite type of jeans in teen fashion. Spending thousands of dollars to buy a ripped jeans from a showroom may not be possible every time. You can easily make your own ripped jeans and will not have to spend a lot of money for the latest fashion trend. The tools and material that you will require to rip your jeans are given below:
  • Coarse Sandpaper
  • Steel Grater
  • Block of Wood
  • Utility Knife
How to Rip Jeans: Arranging a Pair of Jeans
If you are experimenting with ripping jeans for the first time, it is recommended that you get an old pair of jeans. Choose a pair of jeans such that you will not worry unnecessarily, even if you do make a mistake while ripping the jeans. Ripped jeans look great with faded old jeans. If you want to buy a new one, buy a low priced pair of jeans. Ripping a jeans is like making holes and tearing the jeans, thus there is no point buying an expensive pair of jeans.

How to Rip Jeans: Deciding the Area to be Ripped
Once you have arranged for the jeans to be ripped, decide the areas you want to rip. You can search in fashion magazines or just search on the Internet and you will get an idea about the areas of the jeans that are usually ripped. Jeans are generally ripped at pressure areas like hips, knees, pockets and thighs. Make the appropriate pattern you want on the jeans.

How to Rip Jeans: Marking the Areas
After deciding the areas to be ripped, it's time to mark the areas. You should mark the areas by wearing the jeans, this will give you an exact idea of the areas that will be ripped. Use a pencil or a washable marker to mark the ripped areas. Decide properly, the shape and size of the areas to be ripped.

How to Rip Jeans: Working on the Areas
Ensure that you take off the jeans before you start ripping the jeans. There are chances that you can hurt yourself if you rip the jeans while wearing it. Since you have already marked the areas you will not have to worry about the ripping. With the help of a razor or a pair of scissors, make small incisions on the marked. Place the wooden block below the area, this will provide a support while ripping. To fray the jeans, use a sandpaper or a steel grater and scrape the jeans at the incisions. To loosen the fabric at the ripped area, use a safety pin or a small scissor and take out the threads. Give the ripped area the proper shape and pattern of your choice. Your ripped jeans is almost ready.

How to Rip Jeans: Washing the Jeans
Now, wash the jeans at least two times in the machine. This will give the jeans a proper ripping effect. You can use mild bleach or pumice stones to get a faded effect. Wear the jeans and see if you want to give more ripping effects.

Ripped jeans with their torn and skinny exposure have always been a favorite amongst the youth. Go ahead and try to rip your jeans and when you are an expert at it, teach your friends how to rip jeans and become a fashion icon.

How to Rip Jeans

How to Rip Jeans


Ripped jeans have always been a favorite type of jeans in teen fashion. Spending thousands of dollars to buy a ripped jeans from a showroom may not be possible every time. You can easily make your own ripped jeans and will not have to spend a lot of money for the latest fashion trend. The tools and material that you will require to rip your jeans are given below:
  • Coarse Sandpaper
  • Steel Grater
  • Block of Wood
  • Utility Knife
How to Rip Jeans: Arranging a Pair of Jeans
If you are experimenting with ripping jeans for the first time, it is recommended that you get an old pair of jeans. Choose a pair of jeans such that you will not worry unnecessarily, even if you do make a mistake while ripping the jeans. Ripped jeans look great with faded old jeans. If you want to buy a new one, buy a low priced pair of jeans. Ripping a jeans is like making holes and tearing the jeans, thus there is no point buying an expensive pair of jeans.

How to Rip Jeans: Deciding the Area to be Ripped
Once you have arranged for the jeans to be ripped, decide the areas you want to rip. You can search in fashion magazines or just search on the Internet and you will get an idea about the areas of the jeans that are usually ripped. Jeans are generally ripped at pressure areas like hips, knees, pockets and thighs. Make the appropriate pattern you want on the jeans.

How to Rip Jeans: Marking the Areas
After deciding the areas to be ripped, it's time to mark the areas. You should mark the areas by wearing the jeans, this will give you an exact idea of the areas that will be ripped. Use a pencil or a washable marker to mark the ripped areas. Decide properly, the shape and size of the areas to be ripped.

How to Rip Jeans: Working on the Areas
Ensure that you take off the jeans before you start ripping the jeans. There are chances that you can hurt yourself if you rip the jeans while wearing it. Since you have already marked the areas you will not have to worry about the ripping. With the help of a razor or a pair of scissors, make small incisions on the marked. Place the wooden block below the area, this will provide a support while ripping. To fray the jeans, use a sandpaper or a steel grater and scrape the jeans at the incisions. To loosen the fabric at the ripped area, use a safety pin or a small scissor and take out the threads. Give the ripped area the proper shape and pattern of your choice. Your ripped jeans is almost ready.

How to Rip Jeans: Washing the Jeans
Now, wash the jeans at least two times in the machine. This will give the jeans a proper ripping effect. You can use mild bleach or pumice stones to get a faded effect. Wear the jeans and see if you want to give more ripping effects.

Ripped jeans with their torn and skinny exposure have always been a favorite amongst the youth. Go ahead and try to rip your jeans and when you are an expert at it, teach your friends how to rip jeans and become a fashion icon.

How to Hem Jeans

How to Hem Jeans

A common fashion trend for wearing jeans is to retain the original seam and hem. It is obvious that the original length of the jeans does not always fit every one. Also, wearing correct length jeans is important to go with flat shoes. In such cases, we usually go to a tailor for length alteration. At some point of time, you may be in a hurry and do not have time to go to the tailor. No worries, you can hem the jeans on your own within half an hour. Let's take a look at the step- by-step method on how to hem jeans by retaining the original seam.

Easy Tips to Hem Jeans

If you have a sewing machine, you can complete hemming your blue jeans within 25 - 30 minutes. You can stitch with a regular needle and thread if you do not have a sewing machine. One word of caution is to to hem one leg of the jeans at a time. Doing so will allow you to undo it easily, in case of any incorrect measurements or stitching. Following are some easy tips for hemming jeans, which are applicable to all popular jean cuts, be it straight, flared or boot-cut:

The materials required to hem jeans are: measuring tape, scissors, sewing machine (with thicker needle) or regular needle (if sewing by hand), thread (matching color with the original seams), pins, pencil for marking length and an iron. Once you are prepared will all these requirements, you can begin with the task of hemming jeans.

First of all, decide on the appropriate length of the jeans. You can do so by putting on the jeans and wearing the shoes that you want to pair with the jeans. By checking in front of a mirror, you can cuff the jeans at the appropriate length. For this, you can turn the bottom of the jeans inside out and fold them. If you are wearing flat shoes, you can mark the length a little below the ankle (about an inch length). Accordingly you can retain the jeans length for wearing high heels as well.

Mark the length on the jeans with the help of a pencil. If you want to cut 4 inches from the original hem, you can measure 2 inches from the folded bottom (exclude the length of the original hem) and pin at regular intervals. Make sure, you measure the length all around the hem while pinning down, so that you are removing equal lengths all around the hem.

If you are using a sewing machine, you can adjust the sewing foot next to the edge of the original hem (close to the original seam). Finish sewing all around the cuff. In case of sewing by hand, you can follow the same procedure for stitching all around the hem. You can then try whether the altered jean length fits you or not. If not, you can undo the stitch and start all over again.

If the folded material is too long, you can cut off the excess fabric by leaving a length of about half an inch. Otherwise, for short excess fabric, you can iron the folded portion and leave it. With this, you have completed hemming one leg of the jeans. Start with the other remaining leg by following the same procedure as you did for the first one. This way, you can hem jeans easily.

How to Hem Jeans

How to Hem Jeans

A common fashion trend for wearing jeans is to retain the original seam and hem. It is obvious that the original length of the jeans does not always fit every one. Also, wearing correct length jeans is important to go with flat shoes. In such cases, we usually go to a tailor for length alteration. At some point of time, you may be in a hurry and do not have time to go to the tailor. No worries, you can hem the jeans on your own within half an hour. Let's take a look at the step- by-step method on how to hem jeans by retaining the original seam.

Easy Tips to Hem Jeans

If you have a sewing machine, you can complete hemming your blue jeans within 25 - 30 minutes. You can stitch with a regular needle and thread if you do not have a sewing machine. One word of caution is to to hem one leg of the jeans at a time. Doing so will allow you to undo it easily, in case of any incorrect measurements or stitching. Following are some easy tips for hemming jeans, which are applicable to all popular jean cuts, be it straight, flared or boot-cut:

The materials required to hem jeans are: measuring tape, scissors, sewing machine (with thicker needle) or regular needle (if sewing by hand), thread (matching color with the original seams), pins, pencil for marking length and an iron. Once you are prepared will all these requirements, you can begin with the task of hemming jeans.

First of all, decide on the appropriate length of the jeans. You can do so by putting on the jeans and wearing the shoes that you want to pair with the jeans. By checking in front of a mirror, you can cuff the jeans at the appropriate length. For this, you can turn the bottom of the jeans inside out and fold them. If you are wearing flat shoes, you can mark the length a little below the ankle (about an inch length). Accordingly you can retain the jeans length for wearing high heels as well.

Mark the length on the jeans with the help of a pencil. If you want to cut 4 inches from the original hem, you can measure 2 inches from the folded bottom (exclude the length of the original hem) and pin at regular intervals. Make sure, you measure the length all around the hem while pinning down, so that you are removing equal lengths all around the hem.

If you are using a sewing machine, you can adjust the sewing foot next to the edge of the original hem (close to the original seam). Finish sewing all around the cuff. In case of sewing by hand, you can follow the same procedure for stitching all around the hem. You can then try whether the altered jean length fits you or not. If not, you can undo the stitch and start all over again.

If the folded material is too long, you can cut off the excess fabric by leaving a length of about half an inch. Otherwise, for short excess fabric, you can iron the folded portion and leave it. With this, you have completed hemming one leg of the jeans. Start with the other remaining leg by following the same procedure as you did for the first one. This way, you can hem jeans easily.

How to Soften Jeans

How to Soften Jeans


It is my personal experience that most of the expensive jeans are soft, as compared to the stiff feeling imparted by the inexpensive ones. While you can save money by buying such stiff jeans, you have to tolerate the uncomfortable feeling of wearing these jeans. Jeans, which have been touted as the most comfortable casual clothing, will lose its very purpose if it becomes uncomfortable to wear. Sometimes, even some of the expensive jeans are stiff in nature, but don't worry. There is a solution to soften new jeans.

How to Soften New Stiff Jeans
Jeans are made of denim, a thick, heavy and strong fabric. This material is treated in various ways to make it fit for wearing. However, some jeans retain the thickness and heaviness which makes them uncomfortable to wear. This can be overcome by adopting the following method regarding how to soften jeans.
  • Start with removing the price tags and other instruction cards from the jeans. Turn the jeans inside out and wash it with cold water and a small amount of fabric softener, after setting your washer and dryer in 'regular' mode.
  • Once dry, you have to iron the jeans and if needed, a little bit of industrial starch can be used to straighten the fabric. Turn the jeans inside out and roll it into a bundle. Roll it tightly, so that the fabric is stretched to the maximum limit.
  • Now, you have to open the bundle and place the jeans on a leveled surface like a table. Take a scissors, knife, sandpaper or pumice stone to scrape the inner side of the jeans. Scrape it gently in a horizontal manner and remove the fine fibers that are released by the fabric during the process.
  • After scraping both sides of the legs, shake the jeans to remove the fine fibers stuck to it. Now, tightly roll the jeans and pound it with some heavy object in order to soften stiff jeans.
  • The next step is to wash the jeans with hot water. One dry, repeat the washing, but this time add some clean sneakers along with it. The sneakers can help the softening process by removing starch from the fabric when they beat against the jeans.
  • Remove the sneakers and add some fabric softener and rinse well. After washing and drying, you can feel the difference. Your jeans should have lost their stiffness and will become softer after wearing twice or thrice. This is just a basic idea about how to soften jeans. You can try this method on your stiff jeans to make them more comfortable.
Distressing Jeans for Soft Texture
Even though distressed jeans are often used as a fashion trend, the process of distressing a jeans can help you with transforming the heavy fabric of your jeans to a soft one. You can make distressed jeans out of the stiff jeans you have. The process is almost same as that of softening, but in case of softening, the scrapping of the fabric was done on the inner side of the jeans. For a distressed look, you have to scrape the fabric on the outer surface. It may be concentrated to particular areas like knees, hems, etc., or can be done uniformly. You can also adopt some special designs, according to which the scraping is to be done. You can go for some bleaching as well to get that classic faded look. Apart from being trendy, your distressed jeans have become less heavy and more soft, as compared to its earlier form. This is a good, often used method to soften stiff jeans.

It is always better to try your hand on some inexpensive jeans for the first time. Once you are confident of the results, you can adopt this method and share it with anybody who is facing a similar problem. While how to soften jeans is an wasy process, you should not overdo any of the above measures, as it can cause damage to new jeans. You should also be careful not to hurt yourself in the process.

How to Soften Jeans

How to Soften Jeans


It is my personal experience that most of the expensive jeans are soft, as compared to the stiff feeling imparted by the inexpensive ones. While you can save money by buying such stiff jeans, you have to tolerate the uncomfortable feeling of wearing these jeans. Jeans, which have been touted as the most comfortable casual clothing, will lose its very purpose if it becomes uncomfortable to wear. Sometimes, even some of the expensive jeans are stiff in nature, but don't worry. There is a solution to soften new jeans.

How to Soften New Stiff Jeans
Jeans are made of denim, a thick, heavy and strong fabric. This material is treated in various ways to make it fit for wearing. However, some jeans retain the thickness and heaviness which makes them uncomfortable to wear. This can be overcome by adopting the following method regarding how to soften jeans.
  • Start with removing the price tags and other instruction cards from the jeans. Turn the jeans inside out and wash it with cold water and a small amount of fabric softener, after setting your washer and dryer in 'regular' mode.
  • Once dry, you have to iron the jeans and if needed, a little bit of industrial starch can be used to straighten the fabric. Turn the jeans inside out and roll it into a bundle. Roll it tightly, so that the fabric is stretched to the maximum limit.
  • Now, you have to open the bundle and place the jeans on a leveled surface like a table. Take a scissors, knife, sandpaper or pumice stone to scrape the inner side of the jeans. Scrape it gently in a horizontal manner and remove the fine fibers that are released by the fabric during the process.
  • After scraping both sides of the legs, shake the jeans to remove the fine fibers stuck to it. Now, tightly roll the jeans and pound it with some heavy object in order to soften stiff jeans.
  • The next step is to wash the jeans with hot water. One dry, repeat the washing, but this time add some clean sneakers along with it. The sneakers can help the softening process by removing starch from the fabric when they beat against the jeans.
  • Remove the sneakers and add some fabric softener and rinse well. After washing and drying, you can feel the difference. Your jeans should have lost their stiffness and will become softer after wearing twice or thrice. This is just a basic idea about how to soften jeans. You can try this method on your stiff jeans to make them more comfortable.
Distressing Jeans for Soft Texture
Even though distressed jeans are often used as a fashion trend, the process of distressing a jeans can help you with transforming the heavy fabric of your jeans to a soft one. You can make distressed jeans out of the stiff jeans you have. The process is almost same as that of softening, but in case of softening, the scrapping of the fabric was done on the inner side of the jeans. For a distressed look, you have to scrape the fabric on the outer surface. It may be concentrated to particular areas like knees, hems, etc., or can be done uniformly. You can also adopt some special designs, according to which the scraping is to be done. You can go for some bleaching as well to get that classic faded look. Apart from being trendy, your distressed jeans have become less heavy and more soft, as compared to its earlier form. This is a good, often used method to soften stiff jeans.

It is always better to try your hand on some inexpensive jeans for the first time. Once you are confident of the results, you can adopt this method and share it with anybody who is facing a similar problem. While how to soften jeans is an wasy process, you should not overdo any of the above measures, as it can cause damage to new jeans. You should also be careful not to hurt yourself in the process.

How to Fray Jeans

How to Fray Jeans


Frayed jeans with raveled threads at the edges is best for a rugged look. Frayed jeans will always be a part of fashion trends. If you are planning to fray your jeans for the first time, it is advisable to use an old pair. Later on, once you perfect the procedure of fraying, you can have new denim frayed. Fraying is commonly done at the end or at the knees of the jeans. Jeans are even cut and converted into shorts and then frayed. Before knowing how to fray jeans, let us have a look at the tools that you will require in fraying jeans.

Things Required to Fray Jeans
  • Jeans
  • Scissors
  • Nail filer
  • Wire brush
  • Needle
  • Scale and tailor's chalk
  • Sandpaper
These simple things required to fray jeans are easily available at home. You will require some patience in order to have a perfect self-made frayed jean. The following is a step-by-step guide on how to fray jeans at home.

How to Fray Jeans
  • Wash and iron the jeans before you begin to work on it. New ones will probably shrink, which will help you in determining the length.
  • It is advisable to wear the jeans and then mark it because the length may vary. Once you decide the length of the desired fray, make a mark with tailor's chalk on it.
  • Place the jeans on a flat surface and using the scale, draw a straight line on the jeans so that you can have an even cut.
  • You should cut off the hem of the jeans legs so that fraying becomes easier. Now cut the jeans on the marked line with a pair of scissors.
  • With the help of a needle, pull some of the strands at the edges to create a frayed look. A wire brush can also be used to fray jeans. It does not matter even if the edges become uneven.
  • You can even make use of nail file, scissor or knife to create a frayed look for your jeans. Repeatedly rub any one of these tools vertically to fray the jeans.
  • You can even rip jeans or make slits or holes in other areas in the jeans with the help of the needle.
  • In order to create a more destroyed look, you can bleach the jeans or even rub it with sandpaper to create faded and destroyed jeans.
  • As a final step, wash the jeans again to see the effect of your work. Frays and the distressed effect on the jeans look different and more natural after every wash.
  • Try on the jeans after washing and if you find extra long strands after washing the jeans, cut them to the desired length. You can even fray it more if you want.
Long jeans, if worn without altering, can make the strands at the hem loose and will make fraying the jeans a lot easier. You can refer to the following article on how to distress jeans if you wish to create a distressed jeans. This do-it-yourself guide of how to fray jeans will definitely help you to make a pair of frayed jeans yourself. You can try this on any jeans to convert them to a trendy pair of jeans that will surely turn heads!

How to Fray Jeans

How to Fray Jeans


Frayed jeans with raveled threads at the edges is best for a rugged look. Frayed jeans will always be a part of fashion trends. If you are planning to fray your jeans for the first time, it is advisable to use an old pair. Later on, once you perfect the procedure of fraying, you can have new denim frayed. Fraying is commonly done at the end or at the knees of the jeans. Jeans are even cut and converted into shorts and then frayed. Before knowing how to fray jeans, let us have a look at the tools that you will require in fraying jeans.

Things Required to Fray Jeans
  • Jeans
  • Scissors
  • Nail filer
  • Wire brush
  • Needle
  • Scale and tailor's chalk
  • Sandpaper
These simple things required to fray jeans are easily available at home. You will require some patience in order to have a perfect self-made frayed jean. The following is a step-by-step guide on how to fray jeans at home.

How to Fray Jeans
  • Wash and iron the jeans before you begin to work on it. New ones will probably shrink, which will help you in determining the length.
  • It is advisable to wear the jeans and then mark it because the length may vary. Once you decide the length of the desired fray, make a mark with tailor's chalk on it.
  • Place the jeans on a flat surface and using the scale, draw a straight line on the jeans so that you can have an even cut.
  • You should cut off the hem of the jeans legs so that fraying becomes easier. Now cut the jeans on the marked line with a pair of scissors.
  • With the help of a needle, pull some of the strands at the edges to create a frayed look. A wire brush can also be used to fray jeans. It does not matter even if the edges become uneven.
  • You can even make use of nail file, scissor or knife to create a frayed look for your jeans. Repeatedly rub any one of these tools vertically to fray the jeans.
  • You can even rip jeans or make slits or holes in other areas in the jeans with the help of the needle.
  • In order to create a more destroyed look, you can bleach the jeans or even rub it with sandpaper to create faded and destroyed jeans.
  • As a final step, wash the jeans again to see the effect of your work. Frays and the distressed effect on the jeans look different and more natural after every wash.
  • Try on the jeans after washing and if you find extra long strands after washing the jeans, cut them to the desired length. You can even fray it more if you want.
Long jeans, if worn without altering, can make the strands at the hem loose and will make fraying the jeans a lot easier. You can refer to the following article on how to distress jeans if you wish to create a distressed jeans. This do-it-yourself guide of how to fray jeans will definitely help you to make a pair of frayed jeans yourself. You can try this on any jeans to convert them to a trendy pair of jeans that will surely turn heads!

Ashley Olsen Clothes

Anna Wintour Clothes


Lilly Allen Clothes


Dannii Minogue Clothes


Keri Hilson Clothes


Ashley Olsen Clothes

Kate Hudson Clothes

Kim Kardashian Clothes

Ashley Olsen Clothes

Anna Wintour Clothes


Lilly Allen Clothes


Dannii Minogue Clothes


Keri Hilson Clothes


Ashley Olsen Clothes

Kate Hudson Clothes

Kim Kardashian Clothes

Day Dress

Vanessa Hudgens Clothes


Melissa George Clothes


Leighton Meester Clothes


Claudia Schiffer Clothes


Blake Lively Clothes


Sara Rue Clothes

Day Dress

Vanessa Hudgens Clothes


Melissa George Clothes


Leighton Meester Clothes


Claudia Schiffer Clothes


Blake Lively Clothes


Sara Rue Clothes

Cocktail Dress

Donna Air Clothes


Pamela Anderson Clothes


Rebecca Hall Clothes


Diana Vickers Clothes


Julia Roberts Clothes


Kim Kardashian Clothes

Cocktail Dress

Donna Air Clothes


Pamela Anderson Clothes


Rebecca Hall Clothes


Diana Vickers Clothes


Julia Roberts Clothes


Kim Kardashian Clothes

Wednesday, September 15, 2010

Shoulder Tie


shoulder-tie

Preppyism, that smart, collegiate and usually colourful attire, is one of the most enduring and yet one of the most vilified forms of dress. For though it finds back slaps, handshakes and approving bonhomie in the boardrooms of the bankers, the bars of the elite and the gin-palaces of the mighty, it is scorned and spited by the proles. Avril Lavigne, that kohl eyed poker-haired teen ‘rocker’, exemplified the ‘popular’ approach to preppyism in her song ‘Complicated’; “Laugh out when you strike a pose/Take off all your preppy clothes.

Other popular culture has been no kinder to this manner of dress. In Igby Goes Down, Cruel Intentions, Wedding Crashers and just about any other film where the wealthy American elite are subjected to being a morally justified punching bag by the towering hypocrisy of Hollywood, preppy clothes are represented as the attire of evil, the SS uniform of today.

It is little surprise then that this hatred of prep has infected British culture too. The popcorn-munchers, nodding along to the subversive drivel onscreen, have clearly had their taste affected; a female friend of a friend asked me rather awkwardly why I dress as though I live on the Upper East Side; “Have you been inspired by Chuck Bass?” she asked pityingly. Although I informed her rather dismissively that I was wearing bow ties before Bass was even a scribble on a storyboard, I noted a tinge of disapproval too. Preppyism is apparently the act of appearing wealthy; at its baser end it means the donning of labels and logos – particularly Ralph Lauren – and at the more sophisticated end, the sort of styling that belongs at a mid-20th century Ivy League college. Either way, detractors state that it is an affectation to appear wealthier than one is.

One of the flying standards of preppyism is the classic, and often pilloried, jumper-tied-around-the-shoulders. This affectation is one of the trademarks of the preppy look and its deployment causes ridicule as well as raucous WASPish applause. Practically, it makes sense. It may well be too warm for a jumper in the afternoon but by the time twilight sets in, a chill could descend. It is difficult therefore for anyone to begrudge the use of a jumper. However, is a gentleman justified in wearing it tied over his shoulders rather than anywhere else on his body? Couldn’t he just carry it with him, or fold it in a bag?

Firstly, let us consider the other popular options. He could wear it tied around his waist although this is inelegant and impractical; the kilt-ish jumper would get creased and crumpled from being sat on, not to mention the possibility of attracting dirt and grime. Also the associations of this practice (football hooligans, louts) are far worse than anything the shoulder-tie could muster. It could of course be carried, although this would leave only one hand free; not a happy situation when two hands are required. It could be carried in a separate bag although this would only be convenient if the bag was required for some other purpose.

The problem people have is not with the practicality but the image it conveys; if not a ‘detestable’ member of the upper-echelons, a poor parvenu. It looks pretentious in certain contexts and, rather unfortunately, is a habit that has been adopted, at least in my own circles, by some of the more snobbish and vindictive of people. There is certainly an exaggeration and caricature of the practice and it is arguable that Hollywood’s representation of ‘evil snobs’ in the attire would necessarily attract those who consider it a badge of honour to be such a character. However, each man has his own experience of the shoulder-tie – I have no especial dislike of the practice, and have found my own shoulders useful on a changeable summer’s day – but there are those who avoid it, lest they should be associated with the ‘set’ which flaunts the ‘uniform.’

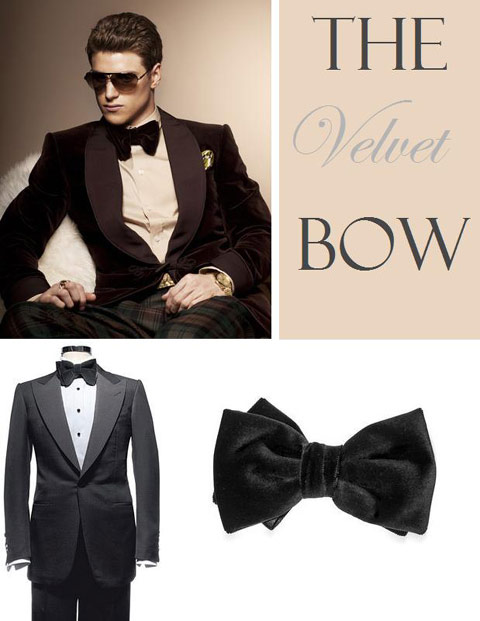
The Velvet Bow Tie


velvet-bow

The duty of wearing black tie is avoiding individualism; refinement is permitted, adornment ill-advised. Most men are not interested in adornment, so the act of wearing what every other man is wearing is actually rather comforting to the majority. As fussy and funny as the ‘t-shirt and shorts’ man might think black tie, when he sees everyone else is so attired, he relaxes into the evening, safe in the knowledge that the oddity he frowned upon in the mirror is not alone.

Other men, the ones who relish black tie, often find it rather frustrating that they have such little room for experimentation. Custom warns against ‘peacocking’ and so they find themselves, however more elegantly cut, in the same attire as every other Tom, Dick and Harry; wool dinner suit, white cotton shirt, black silk bow. A rogue pocket square is a temptation, but so often regretted and though buttonholes are an addition frequently neglected by the majority, many well-dressed men are still reluctant to employ them. One friend ‘dissed’ my red carnation and informed me that a modern James Bond “would never wear a flower.”

The choices for subtle individuality are slim. A stiff shirt with a detachable stiff collar is certainly an option but it’s bothersome and takes practice and patience. A creamy white jacket isn’t as smart or as practical as black or midnight blue, and many consider it ‘out of context’ if deployed away from Glyndebourne or the Riviera. Waistcoats are useful, but a no-go in the warmer months and they are increasing in popularity, threatening their status as a choice for the ‘individualist.’ I think both patent Oxfords and pumps are wonderful; still surprisingly rare and very elegant. However, many graceful and frustrated gentleman already own a pair or two and are seeking something different, something more unusual which will mark them as a man of thought and subtlety.

Bring forth the velvet bow tie. Shocking? No. Brave? No. Unusual? Certainly; however ordinary the idea of a velvet bow tie seems, you would be hard pushed to find another at the same event. It has a mildly foppish quality, something between Austin Powers and David Niven, and it offers an alternative texture and structure to silk, contrasting perfectly with one’s lapels. It’s also ever so slightly naughty; the velvet bow tie man is certainly not a ‘stiff in a suit.’ There is a faint and attractive hint of scandal about him; he has seen things, done things – but of those things, no one dares speak. He might be tempted to pair his bow with a ‘waterfall’ pocket-square but this would hamper his underlying masculinity; a simple puff of creamy silk will suffice.

The hell of it is, the self-tie velvet bow, the answer to the ‘subtle individualist’s’ black tie prayers is, rather fittingly, a devil to find.

Related Posts Plugin for WordPress, Blogger...